42 Partners - Relux - Imported Data
- Background:
-
- Relux users are sometimes surprised that luminaires using imported data behave differently to those selected from a member's database. Relux members can specify the default placing of luminaires by using special settings in their database, for instance a wall mounted luminaire will automatically align with the walls when used in Relux. Products can be tagged to behave as recessed, surface, pendent, wall or floor mounted. Relux constructs the physical and luminous geometry of the luminaire from dimensions in the database, and can also construct realistic luminaire geometry from 3D CAD models. Placement information and realistic luminaire geometry information cannot be included in any of the standard photometric data file formats used to import luminaires into a Relux scheme.
- Relux users are sometimes surprised that luminaires using imported data behave differently to those selected from a member's database. Relux members can specify the default placing of luminaires by using special settings in their database, for instance a wall mounted luminaire will automatically align with the walls when used in Relux. Products can be tagged to behave as recessed, surface, pendent, wall or floor mounted. Relux constructs the physical and luminous geometry of the luminaire from dimensions in the database, and can also construct realistic luminaire geometry from 3D CAD models. Placement information and realistic luminaire geometry information cannot be included in any of the standard photometric data file formats used to import luminaires into a Relux scheme.
- Photometric data file formats:
-
- The two most common photometric data file formats used to import luminaires into a Relux scheme are:
LDT EU Lum Dat (European Luminaire Data) commonly known by the conventional file extension LDT
IES IESNA LM-63 (Illuminating Engineering Socity of North America standard) commonly known by the file extension IES
The photomatric performance of any luminaire can be described equally well by an LDT file as by an IES file. Properly formatted files of either type will yield exactly the same calculation results in a lighting design program, however there are differences in the file structure that mean they will behave differently when imported into Relux.
Both file types contain dimensional data for the luminous parts of the luminaire. LDT files contain additional data for the physical dimensions of the luminaire that cannot be included in IES files. These differences can affect the behaviour and appearance of imported luminaires in a Relux scheme.
- The two most common photometric data file formats used to import luminaires into a Relux scheme are:
| LDT file import | IES file import | |
 |
 |
|
|
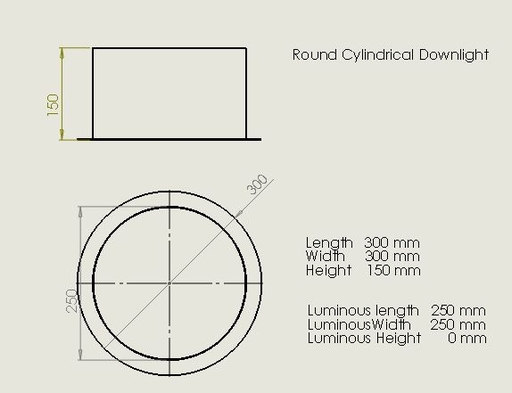
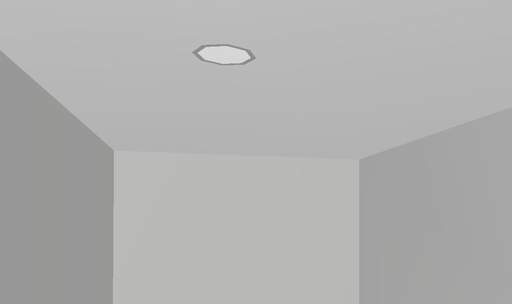
Relux correctly builds the luminaire and displays a physical length, width and height with a 250mm diameter flat luminous area with zero luminous height. Because the file has a real height, Relux assumes the luminaire is suspended and sets its default position 0.5m below the ceiling. |
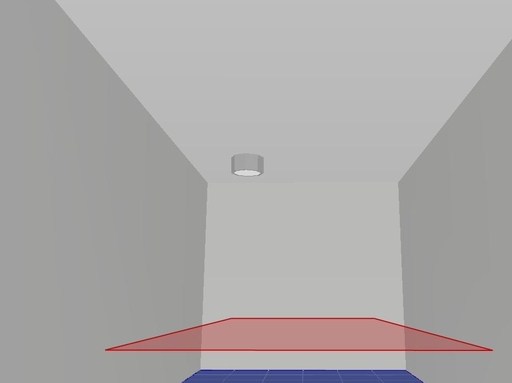
As there are only luminous dimensions, Relux shows the luminaire as a flat disk 250mm in diameter with no bezel or body. (Relux actually gives the luminaire a 1mm height to avoid appearance problems associated with infinitely thin bodies). This can cause problems if the designer needs to space these luminaires close to other objects, the user cannot rely on the appearance of the luminaire on the screen to be the same as the physical dimensions. As there is no luminous height, Relux interprets the luminaire as being recessed, assigns the insertion point as the top surface of the luminous area and by default places this on the ceiling. |
|
 |
 |
|
|
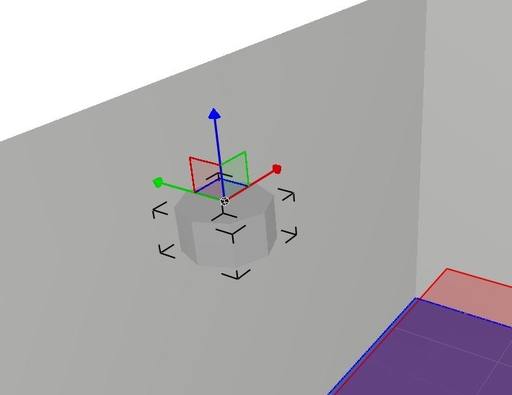
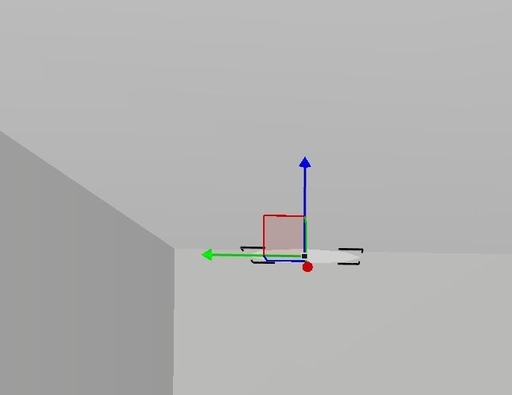
If we select the luminaire to show the insertion point, we can see that Relux sets this as the centre of the top face of the cylindrical body. Setting the Luminaire Z position to the ceiling height sets the top of the body flush with the ceiling i.e. the correct position for a surface downlight. This appearance cannot be displayed using an IES file. |
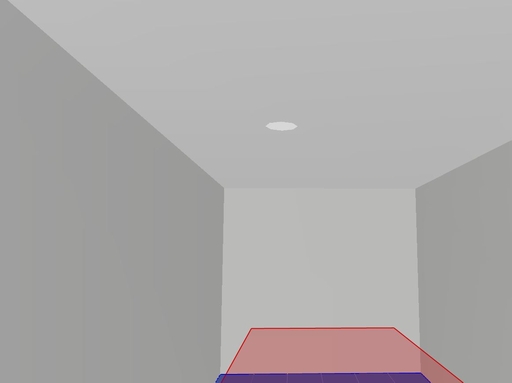
If we select the luminaire to show the insertion point, then move the luminaire into the room, it is clear that the luminaire has no physical height. |
If we want the downlight in the previous example to behave as a recessed luminaire, we can do this in an LDT file by modifying the physical height to Zero. This is the only change necessary to make the luminaire behave as recessed. When we import this file into Relux it looks like this :-
Relux displays a recessed luminaire BUT it still shows the non luminous bezel.
This appearance is impossible if you use IES files.
Making the most of an IES file
If IES files are all that is available, Relux users can can manually enter the missing dimensions using the "Modify Luminaire" tools.
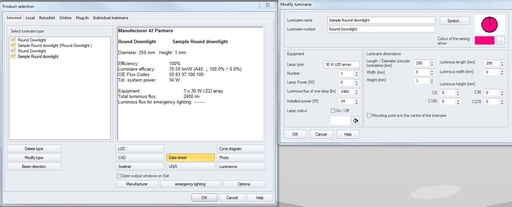
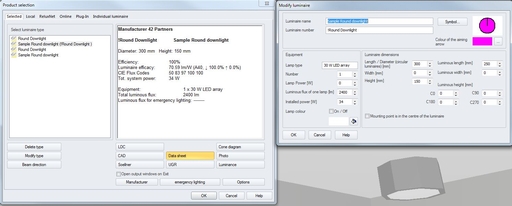
| When imported, the unmodified file and its data looks like this: | After modification, the luminaire looks like this: | |
 |
 |
|
| Length is shown as 250mm | This needs to be modified to 300mm | |
| Height is shown as 1mm | This needs to be modified to 150mm |
By manually entering the missing data you can make the imported IES file behave properly, but this modification is confined to the Relux Project you are working on.
The IES file you are importing remains unchanged and there is no facility in the IES data structure to add physical dimensions.